
Creating gorgeous resin charm crafts for kids has become one of my favorite activities for birthday parties, play dates, and quality crafting time together! As a mom of three and former educator, I've found these simple craft projects offer the perfect combination of creativity and functionality, producing keepsakes that my kids actually treasure and use!
These four projects - a personalized mirror, decorative keychain, custom picture frame, and designer sunglasses - transform ordinary supplies into the cutest creations that kids love making and using!
Why Kids Love Resin Charm Crafts
Kids absolutely love resin charm crafts because they offer maximum creativity and innovation yet are so simple to make. Sensory experience, problem-solving, spatial awareness, and fine motor skills are all at work as your children design and create these resin charm crafts!
Learning Opportunities:
- Fine motor skill development through precise placement
- Basic design principles exploration
- Following multi-step directions and project planning skills
- Creative problem-solving and artistic expression
- Confidence building through completed project success
- Mathematical concepts through measuring and sizing
Essential Supplies for Your Resin Charm Projects
Before starting these resin charm crafts for kids, gather your materials from my curated and convenient Amazon shopping list: Resin Charm Craft Supplies
Basic Materials Needed:
- Resin-back charms in various sizes
- Strong craft adhesive
- Project-specific base items (mirrors, sunglasses, frames, keychains)
The beauty of these resin charm crafts for kids is their simplicity - just three basic components create gorgeous items that your kids will love making and using!

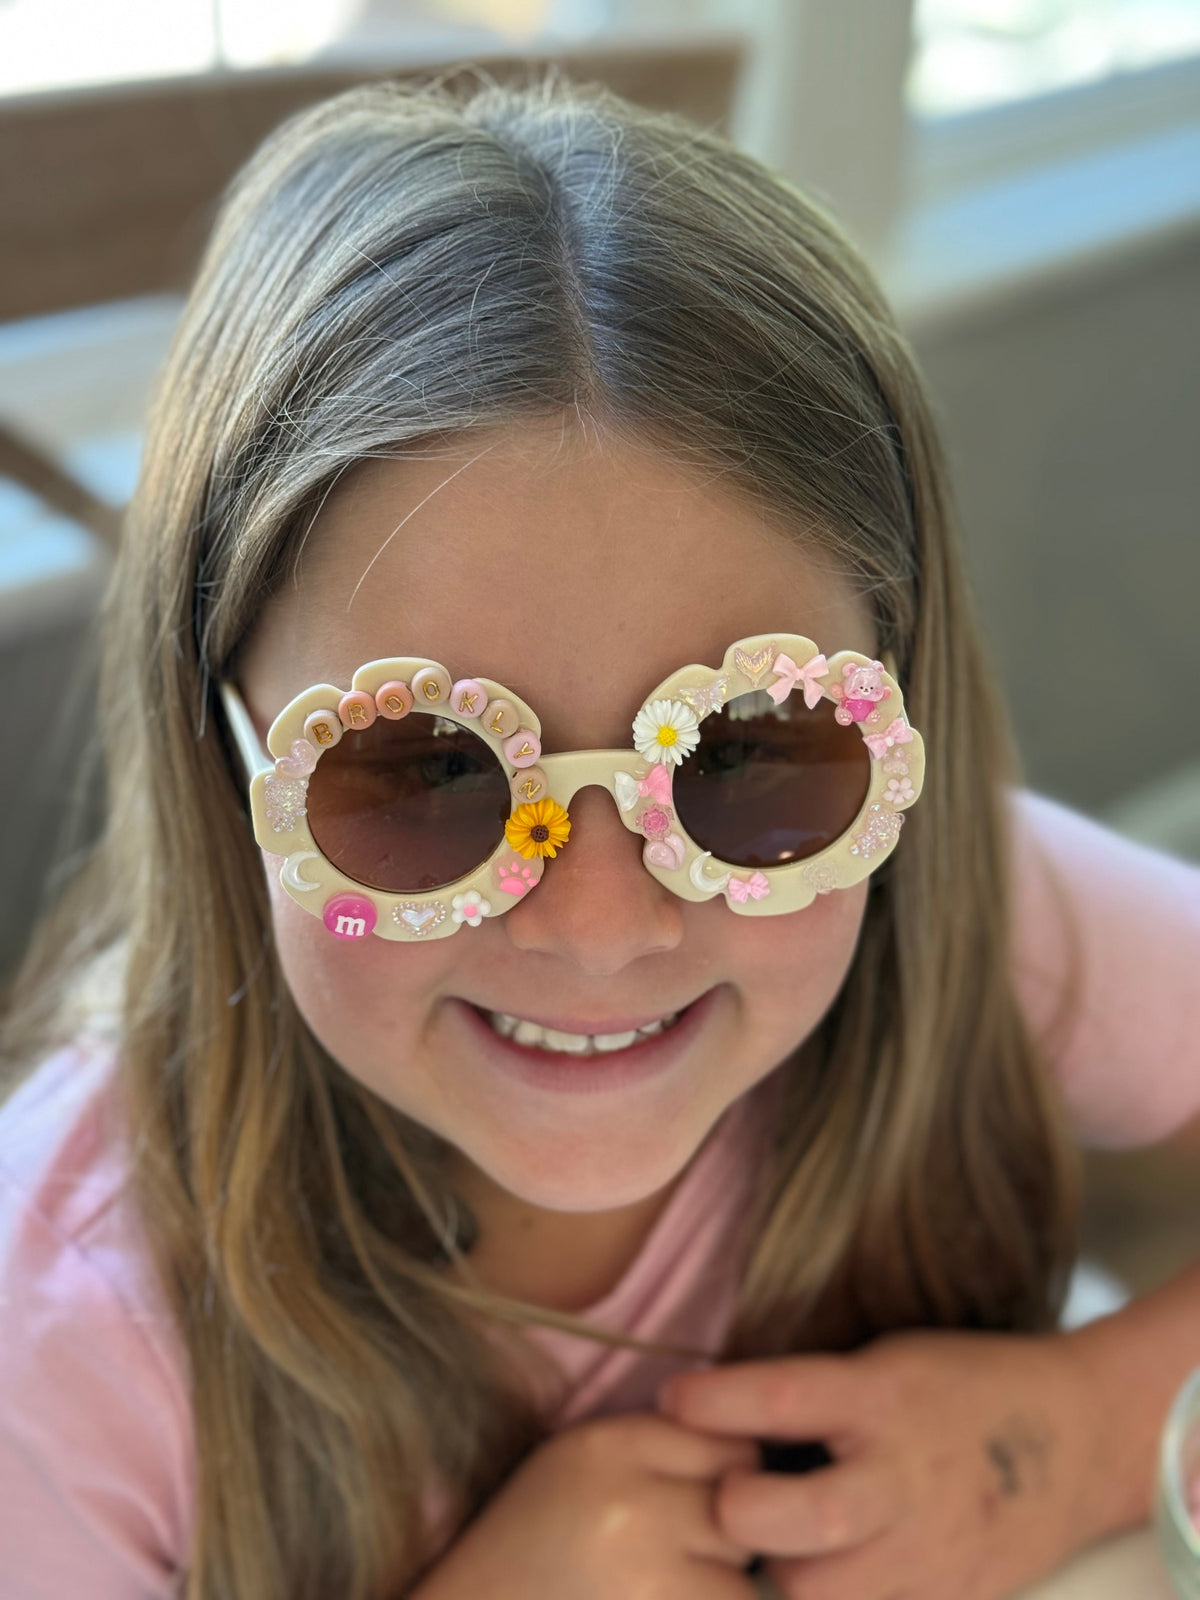
Resin Charm Crafts #1: Personalized Sunglasses
Transform ordinary sunglasses into a custom and personalized accessory that your child will be so excited to wear because it's 100% made by them.
Resin Charm Sunglasses Materials:
Step-by-Step Mirror Instructions:
Step 1: Set up a tray with your materials and mix of charms.
Step 2: Clean or dust the sunglass frame to ensure proper adhesion.
Step 3: Have your child place the charms and create the design without glue first.
Step 4: Once they are done designing, it's time attach the charms! Apply strong craft glue to the flat back of the resin charm. Position it carefully on the sunglass frame and press firmly for 30 seconds.
Step 5: Allow 24 hours for the adhesive to fully cure before handling or wearing the sunglasses.

Resin Charm Crafts # 2: Personalized Keychains
These personalized keychains make excellent Girl Scout or playdate projects or birthday party take-home gifts!
Resin Charm Keychain Materials:
Step-by-Step Mirror Instructions:
Step 1: Set up a tray with your materials and mix of charms.
Step 2: Clean or dust the keychain to ensure proper adhesion.
Step 3: Have your child place the charms and create the design without glue first.
Step 4: Once they are done designing, it's time attach the charms! Apply strong craft glue to the flat back of the resin charm. Position it carefully on the keychain and press firmly for 30 seconds.
Step 5: Allow 24 hours for the adhesive to fully cure before handling or wearing the keychain

Resin Charm Crafts #3: Personalized Photo Frame
Transform simple picture frames into beautiful decor for your child's room!
Resin Charm Frame Materials:
Step-by-Step Frame Instructions:
Step 1: Set up a tray with your materials and mix of charms.
Step 2: Clean or dust the frame to ensure proper adhesion.
Step 3: Have your child place the charms and create the design without glue first.
Step 4: Once they are done designing, it's time attach the charms! Apply strong craft glue to the flat back of the resin charm. Position it carefully on the frame and press firmly for 30 seconds.
Step 5: Allow 24 hours for the adhesive to fully cure before handling or using the frame.
For complete step-by-step instructions with photos and additional tips for this resin charm craft, check out my detailed tutorial: Fun Craft Ideas for Girls: Adorable Charm Photo Frames

Resin Charm Crafts # 4: Personalized Hand Mirror
This charming handheld mirror project is perfect for birthday parties or special, personalized gifts!
Resin Charm Mirror Materials:
Step-by-Step Mirror Instructions:
Step 1: Set up a tray with your materials and mix of charms.
Step 2: Clean or dust the mirror back to ensure proper adhesion.
Step 3: Have your child place the charms and create the design without glue first.
Step 4: Once they are done designing, it's time attach the charms! Apply strong craft glue to the flat back of the resin charm. Position it carefully on the mirror surface and press firmly for 30 seconds.
Step 5: Allow 24 hours for the adhesive to fully cure before handling or using the decorated mirror.

Safety Guidelines for Resin Charm Crafts
Following these guidelines to ensure a positive and safe crafting experience!
Important Safety Considerations:
- Adult supervision recommended
- Use child-safe scissors and age-appropriate adhesives
- Ensure adequate ventilation when using adhesive products
- Keep small parts away from toddlers who might put items in mouths
- Allow proper drying time before handling finished projects
Your Turn to Play!
These four resin charm crafts for kids - personalized mirrors, custom keychains, decorative picture frames, and designer sunglasses - offer endless possibilities for creative expression while developing important skills and creating cherished memories. Whether planning birthday party activities, organizing group workshops, or seeking engaging home projects, these crafts deliver impressive results with minimal preparation. I can't wait to see what you create!
Disclaimer: This post may contain affiliate links. If you purchase through these links, I may earn a small commission at no additional cost to you. All recommendations are based on items I personally use and love with my own children.

Written by Brittany, Stay at Home Activity Mom
Brittany is a former elementary school teacher turned stay-at-home mom of three. Passionate about children learning through play, she began sharing her simple, hands-on, and education activities on her Instagram @stayathomeactivitymom so that other parents could see how fun this type of at-home learning can be.


